Pages

Sunday, December 23, 2012

Mouth Watering Fried Chicken Tenders

If you get a deep fryer for Christmas, this would be a great way to break it in.
If you don't have a deep fryer a deep cast iron or stainless steel pot will do.
My daughter and I made these at her home, the gadgets belong to her.  She enjoys cooking and her gadgets too!

The delicious recipe we made was one that my daughter created, and I wasn't able to get the exact measurements for this post. I was able to find a very similar recipe from a Rachel Ray, Food Network.

Gadgets used:  Tongs, deep fryer.  If using a cast iron or deep pot use a Taylor deep fry/candy thermometer.   Taylor Digital Fork Thermometer.
Ingredients 


Reconstituted buttermilk
Dry ingredients and chicken tenders in zip lock bag.

No more than this in the basket (6 small tenders)

Crispy on the outside, juicy on the inside!


Testing for doneness: 165 degrees
http://www.foodnetwork.com/recipes-and-cooking/meat-and-poultry-temperature-guide/index.html

Ingredients

  • 2 tablespoons smoked sweet paprika
  • 1 tablespoon granulated garlic
  • 1 tablespoon granulated onion
  • 1 tablespoon poultry seasoning
  • 2 pounds chicken tenders
  • Salt and freshly ground black pepper
  • 2 cups buttermilk (you can buy dry buttermilk powder in the baking aisle, it keeps longer than fresh)
  • 2 cups all-purpose flour

Combine the smoked paprika, granulated garlic and onion, and poultry seasoning in a small bowl.
 Season the tenders with salt and pepper.
Add 1/2 the spices to the buttermilk in a shallow dish.
Combine the remaining spices with the flour a zip lock bag.
Heat the oil in a deep fryer or if using a heavy pot/cast iron or stainless steel,  set temperature to medium to medium-high heat, about 350 degrees F.
Using tongs dip chicken in the buttermilk, then place the chicken into the zip lock bag, shake to coat.
Add the breaded tenders to the hot oil; do not crowd the pan. Cook the fingers in batches to a deep golden color, about 8 minutes per batch. Drain on a wire rack over paper towels. 


Saturday, November 3, 2012

Thanksgiving Worthy Riced - not Mashed - Potatoes

After watching countless cooking shows and seeing this gadget - ricer - I decided to give it try.  I bought a small ricer and a large one. The potatoes came out creamy, no lumps, and delicious.  This will now be my preferred method of preparation for potatoes in the future. Well worth the gadget investment! I posted the gadgets I purchased through Amazon.

Here is a good basic recipe for perfect Riced/Mashed Potatoes.

The secret is to use the right potatoes, milk or cream and if you chose to mash, do not over mash.

I'm posting this recipe because the author also recommends using a potato ricer.
Allrecipes has a great potato recipe, but it is for a larger quantity and has non-traditional ingredients.
http://allrecipes.com/recipe/the-best-mashed-potatoes/


Perfect Mashed Potato Recipe
Recipe Type: Potatoes
Menu: Thanksgiving Turkey Dinner Menu
Yields: 4 servings
Prep time: 20 min
Cook time: 20 min

Ingredients:
1 1/3 pounds (4 medium) Russet or Yukon Gold potatoes washed, peeled, and cut into uniform 2-inch chunks*
1 teaspoon salt, divided
2 tablespoons warm butter
1/2 to 2/3 cup hot milk, half &  half, or cream**
* Do not cut the potatoes into smaller chunks as too much water will be absorbed by the potatoes. After cutting the potatoes, immediately place in cold water to prevent discoloration of the potatoes.
** Buttermilk may be substituted.

Preparation:
In large saucepan, Add cut-up potatoes, 1/2 teaspoon salt, and just enough cold water until potatoes are covered; bring to a boil.  Reduce heat to medium; cover and let simmer 15 to 20 minutes or until potatoes are tender when pierced with a fork.
While potatoes are cooking, either in another saucepan or microwave, heat butter.  Also heat hot milk or cream to a simmer (do not boil) separately from the butter in another saucepan or microwave. NOTE: Do not add cold butter or cold milk/cream to when making mashed potatoes.
When the potatoes are cooked, remove from heat and immediately drain potatoes thoroughly in a colander. Return to saucepan; heat over medium-low heat approximately 1 to 2 minutes to dry potatoes, stirring occasionally.  NOTE: Boiled potatoes left in water will start to jellify and may even increase in volume, becoming swollen and watery. That is why it is important to let the potatoes drain for a couple of minutes in a colander immediately after they are cooked.

In the same saucepan that the potatoes have been heated in, mash potatoes with a potato masher, potato ricer, fork, or beat with electric hand mixer until chunky.  Stir in warm butter, remaining 1/2 teaspoon salt, and 1/2 cup of the hot milk.  Add additional milk, a little at a time, if necessary, for desired consistency.

Note: Gluey or gooey mashed potatoes are caused by vigorous over mashing, as anyone who has tried to make the side dish in a food processor can attest. When potatoes are boiled, their starch granules swell. If those granules are broken too vigorously, the cells release copious quantities of starch, resulting in a potatoes with the consistency of wallpaper paste.
Season to taste with additional salt, if desired.
"I personally use a potato ricer when making mashed potatoes. Using a potato ricer, you can make velvety smooth mashed potatoes right at home because potatoes come out fluffy without being gummy. Once you use the potato rice, you will never go back to the old traditional potato masher." 

Serve immediately.
Makes 4 servings.


Rookie mistake: I left the skins on.

Skins made it difficult to get the job done.
Won't do that again. Peel potatoes.


I added cooked, riced carrots to my riced potatoes. 


Friday, October 12, 2012

WOW Chocolate Chip Cookies

Has this ever happened to you? Have you ever bought an ingredient and forgot which recipe you bought if for? I bought a bag of Bob's Red Mill Whole Wheat Pastry Flour for a recipe I wanted to make, but then forgot which recipe it was.  So I decided to make one of the recipes listed on the bag.

The recipe: WOW Chocolate Chip Cookie
1/2 cup non hydrogenated margarine
1/3 cup oil (I used canola)
1 1/2 cups sugar
3/4 cup milk (soy,rice,cow)
2 tsp vanilla
2 1/2 cups Whole Wheat Pastry Flour
1 1/4 cups regular rolled oats
1 tsp baking powder
1 tsp baking soda
1/2 cup chopped walnuts
1/2 cup chocolate chips

Cream together margarine, oil and sugar until very well blended. Add in milk and vanilla and blend.
In a separate bowl, mix together the flour, oats, baking powder and soda. Stir dry ingredients into wet ingredients.
When half blended, add in the walnuts and chocolate chips.
Mix everything until just blended, do not over mix.
Refrigerate for 20 minutes.
Place by the tablespoon on a greased cookie sheet.
Bake at 350 degrees for about 10 - 12 minutes.
Makes 2 dozen cookies

My notes:  I used butter, I added one mashed, ripened banana. The chocolate chips used were the large Nestle Dark Chocolate  Morsels, 53% cacao, I used 1 cup of nuts, 1 cup of chocolate chips.

Gadgets used: Kitchenaid mixer, paddle and pouring shield; silpat mat; cookie scoop 11 1/2" x 16 1/2"cookie sheet, (measured from the inside of the tray.)


Ingredients & Mixer Paddle

Mix Dry Ingredients Together

Blend Wet Ingredients

Slowly Add Dry to Wet.
Good time to use Kitchenaid Pouring Shield if you have it.

Batter after the nuts and chips have been incorporated.
Gadgets: Silpat mat, cookie sheet, small scoop.

Raw cookies ready to bake!

Cooked and ready to eat!

Second batch ready to go. First batch cooling.
I must admit eating quite a few hot, melty cookies.
They were moist, chewy with a slight hint of banana flavor.


Should you decide to make any purchases from Amazon (not just kitchen gadgets),
I would appreciate it if you would start from the Amazon Search Box on my blog.
Thank you!


Friday, September 7, 2012

Marvelous Madeleines for Dessert

Marvelous Madeleines for Dessert

I was invited for lunch at my friend, Emily's home the other day.
When I walked into her kitchen, I saw a recipe and baking ingredients coming to 
room temperature on her kitchen island. Mmm looks like we'll be making 
our dessert today.  Last time I visited, I took my bread machines and
we made several dough related items.  
Cooking during our visits is becoming a fun tradition.

After lunch we started making our dessert.
We used Martha Stewart's recipe, but used almond extract instead of vanilla.
If you like lemon flavor, use lemon extract.
The other change we made, was that we didn't let the batter sit two hours.
We used it as soon as we were done mixing it.


Picture of the recipe, too small to read, so use the link I provided.

All the ingredients.

Two Madeleine pans.

Pans that have been buttered & floured.
You can also spray them with a cooking spray or Baker's Joy .

Whipping up the batter to an almost meringue consistency.

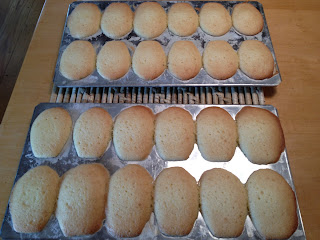
Our first batch. We later found out, that even though
the recipe says to "mound",
 the amount in the pans was too much.  

They came out lightly browned and a bit too big.
We let them cool only for a minute of two before gently removing them
with a butter knife and putting them on cooling racks.

The six cookies from the top were the overfilled ones.
The bottom six were just right. We used a little less
than 1/4 cup of batter in a 1/4 measuring cup
 to fill the molds.

Cooled cookies were then lightly dusted with confectioner's sugar.


Makes 48 cookies when done with the correct amount
of batter in each mold.
If you don't plan to eat these with a few days,
they can be frozen  in small freezer bags.
Do not dust with confectioner's sugar on the
cookies you plan to freeze.

These cookies are light, fragrant, moist and as delicious as they look!

We enjoyed a few of them with a piping hot cup of coffee.


The pans below are the non stick ones that I have.  The ones used above are aluminum.
Both will work just fine.

Martha's recipe calls for a pastry bag. We used a 1/4 cup measureing cup.
If I knew we were baking these, I would have taken my batter pen.


Saturday, September 1, 2012

Great For a Light Summer Lunch or Dinner; Hand Held Mini Quiches


For the past few weeks, when I open my fridge I see the long, red box containing two ready made pie crusts. Trying to think of what I can do with them, I remembered the Wilton Mini Pie Pan I had bought and had never used.

 If you don't have one of these pans, you could use a muffin tin.  Just remember to check the cooking time, because the well will be deeper in a muffin/cupcake tin and you may need a minute or two more in the oven. Test with a toothpick, if it comes out wet, keep cooking; if it comes out clean, it's done.

I was more in the mood for quiche than I was for pie, so I gathered up some ingredients that I thought would be good in a quiche and got busy!

Gadgets; Wilton Mini Pie Pan or cupcake tin; whisk, cheese grater or Presto Salad Shredder w/cheese grater attachment; kitchen potato peeler; microwave bacon cooker.  If you do a site search, all can be seen on previous posts or do an Amazon search from my site to bring up any of the products used and shown on my blog.

Flexible Recipe for Mini Quiches

Flexible, meaning you can substitute your personal preferences for meats, cheeses and veggies.

5 medium eggs & 2 Tbsp. water -  whisk until frothy; season with salt and pepper.
Add to eggs:
2 Tbsp. chopped chives
2 strips of cooked bacon - crumbled
2 Tbsp. sauteed onions - salt & peppered.

Pour into four uncooked pie shells. Top each with 2 Tbsp. grated cheese. If using parmesan, use a potato peeler and shave three or four good size pieces on the top.
Bake for 12 minutes in a preheated 350 degree oven or until done.
If you are using a muffin/cupcake tin, this recipe will make approximately six mini quiches.
Note: Spray pans with Pam or other cooking spray to insure easy removal.

Wilton Mini Pie Pan from Michael's craft store.
You may find this where Wilton products are sold.

Ingredients for mini quiches.

Five inch copper canister lid was used to
cut out 4 circles from one pre-made pie crust.

Spray with Pam.
Two of the cut out crusts needed to be pieced together.

Four medium/mini quiches.
Two have shaved parmesan on the top,
and two have grated sharp cheddar.


Baked and ready to eat by hand or with a fork & knife.
Serve with soup or salad.

Saturday, August 25, 2012

A Memory Revisited: Italian Zucchini Fritters

 I was able to squeak out a few vegetables this year from my small 4' x 6' raised bed garden.
I only had two zucchini plants, one died the other produced enough zucchini 
for me to keep and to give a few away.  I used my last one to make these flavorful fritters.

I remember growing up in an Italian household, having these fritters "frittata" 
during the summer months when the relatives' gardens were
abundant with zucchini.  Making them brought back fond memories.
Hope you make some memories in your kitchen with your family.

The recipe for Italian Zucchini Fritters

3 cups shredded and drained zucchini
6 eggs well beaten to a froth
1/2 tsp. salt
1/4 tsp. pepper
1/4 tsp. garlic powder
2 Tbsp. fresh basil (optional)
1 cup Romano or Parmesan cheese or 1/2 cup of each
1 1/2 cup all purpose flour - add a little at a time.
Makes about 30 three inch round fritters.
These are good cold too!

Using a Presto Salad Shooter, or a box grater; grate one medium (9 inch) zucchini.
Put the shredded zucchini in a colander over a bowl, put a plate on the zucchini 
and weight the plate with a heavy can - we use a 28 oz can of tomatoes.
In about 15 minutes or so some water will drain out.  
You can do this step the day ahead and refrigerate the bowl of weighted zucchini.

In another bowl add seasonings to the egg mixture, add cheese, 
add the drained zucchini, slowly incorporate the flour as needed to form
a firm batter (much like a pancake batter).  Make a test fritter to see
if your batter is firm enough.

Set an electric skillet set to 375 degrees.  Add 1/4 cup olive oil.
Test oil to see if it's hot enough to add your test fritter by 
putting the handle end of a wooden spoon into the oil
If bubbles come up around the wooden post, oil is hot enough.

Drop a tablespoon of batter into the oil.
If your test fritter puffs up and gets firm, like a pancake you are good to go.
Taste it for flavor. Add salt and/or pepper if needed.
Continue cooking fritters by dropping tablespoons
of the batter into the hot oil.
Flip when the bottom gets lightly browned. Cook another two minutes.
Remove to paper towel covered plate, pat top with another paper towel.
Enjoy hot or cold. 


Presto Salad Shooter, zucchini - whole and shredded in the bowl.

Shredded zucchini draining in a colander. 

Ingredients

Oster Electric Skillet & Tupperware batter bowl/measuring pitcher.
Test fritter: One tablespoon of batter in hot oil

Browned fritter, ready to take out.
I used two forks to flip so I don't have to dig one fork
into the wet batter.

The lightly browned tops.
You can make your fritters bigger, but be sure they are
flat enough so the insides cook thoroughly.


Friday, August 17, 2012

Awesome Homemade Ice Cream Cones!

On a recent visit, my Mom & I were outside enjoying a nice summer day.  The subject of ice cream cones came up. My Mom mentioned  how terrible her store bought ice cream cones were. I said 
"Let's go in and make some homemade ones."  So we did!  I don't know why she was surprised that I had a gadget that made ice cream cones, but she was.

After the cones were done and cooled, we enjoyed some maple walnut ice cream in our tasty cones. My Mom just loved the cones and how light and crispy they were.  I made sure she took some home to enjoy later.

You can use this recipe with a pizzelle machine for tiny cones, or use the skillet method mentioned in the recipe below. The results will be delicious no matter which method you use.

Recipe taken from allrecipes.com

Ingredients

  • 2 eggs
  • 1/2 cup white sugar
  • 1/4 cup butter, melted and cooled
  • 3 tablespoons milk
  • 1/2 teaspoon vanilla extract
  • 1/3 cup all-purpose flour
  • 1/8 teaspoon salt
  • 3 tablespoons vegetable oil, or as needed

Directions

  1. Whisk together the eggs and sugar in a large bowl until frothy. Whisk in the butter, milk and vanilla. Gradually whisk in the flour and salt until smooth. The batter should be thin; you can stir in more milk if needed.
  2. Heat a small skillet or griddle over medium heat. Brush the pan lightly with oil. Pour about 1/4 cup of batter onto the skillet and turn to spread out the batter into a thin circle. When the underside is golden brown, flip over and cook until golden on the other side. Remove from the pan and form into a cone while it's hot, squeezing the end to seal. Place on a wire rack to cool and harden completely. Repeat with the remaining batter.


Waffle Cone machine from Amazon.
I put a Camel, Camel, Camel price alert on it
and got it when the price dropped to $29.
I also have a Bella brand electric ice cream cone machine from Macy's that my sister & family gave me:
http://reviews.macys.com/7129/470163/bella-cucina-13468-waffle-cone-maker-reviews/reviews.htm
Both machines turn out great waffle cones.


Simple ingredients you should have on hand.

Light, foamy batter.

About 1/4 cup batter.
As soon as the green light goes on, open and quickly
wrap the cookie around the plastic cone (included) to
shape it, remove when cool (about a minute).

Tried different heat settings. Went from #1 to #4. #4 gave
the darkest and crispest result.
Makes 10, six inch tall cones.

Friday, August 10, 2012

Quick Sauce & Quick Pizza Dough, No Rise, No Fail & Grilled Pizza


If you've ever wished to have pizza for lunch or dinner, but don't have store bought or homemade dough on hand, this is a great "go to" pizza dough for a quick pizza.  It's delicious, but does not have the same texture as a dough that has had time to rise.

Gadgets you'll be using: food processor, rolling pin, BBQ grill (I have the Weber Q), or cast iron stove top grill, cutting board, pizza cutter.


Dough: (makes two rectangular pizzas - approx size 9" x 14")

3 cups all purpose  flour
1 tsp. salt
1 Tbsp. sugar
1 package dry active yeast or 2 1/4 tsp. yeast granules
1 cup warm water (100 - 110 degrees)
2 Tbsp. vegetable oil

Put all the above ingredients in the order given into a food processor, mix/pulse  flour, salt, sugar, yeast together.

Divide dough in half. Roll each piece of dough into a thin rectangle.
Heat grill to 400 degrees. (High)
Oil grates with olive, vegetable, or canola oil.
Have a tray two long spatulas and with your toppings* close by the grill.

Put one of the pieces of dough onto the oiled grates.  Let it cook until the bottom shows nice, dark grill marks.  Get your two spatulas, put them both underneath the pizza dough, lift and flip.
Reduce heat to Medium.
Quickly add your toppings.
Close the grill lid, cook for approximately 2 -3 minutes.
Check to see that the cheese is melted and that the bottom crust has dark grill marks.
Remove to a cutting board, let set for a minute, cut and serve.

*Toppings:
Shredded or a cut up whole ball of mozzarella (and parmesan if you like).
Any toppings you happen to like on pizza.
Homemade Quick Sauce* or tomato sauce from a jar

I had a video to go with the above recipe. My camera angle was a bit off and, sadly, the end result was not blog worthy.

*Homemade Quick Sauce:

1 28 oz. can kitchen ready tomatoes
1 Tbsp. tomato paste
1/4 cup olive oil
1/2 cup cut onions or shallots
1/2 tsp. salt
1/2 tsp. pepper
1 Tbsp. sugar
2 tsp. Italian seasoning, or Basil (dry)

In a medium saucepan, add oil, saute onions over medium heat.
Add the remaining ingredients. Cook for 15 minutes.
Note:  If you have time, add 28 oz. water to the sauce  (just fill the empty tomato can) with the remainder of the tomato paste cook for about 30 minutes, and you'll have a bigger batch of sauce for pasta or more pizza.

Not the best video, but hopefully, you'll get the idea.


Can opener that I've used in other Kitchen Gadget posts. I've had this one for a few years and use it as my primary can opener. The batteries seem to last a long time.  If you have a Tuesday Morning nearby, they have them there.


Friday, July 27, 2012

Crave-able Lemon Ricotta Clouds (Cookies)

I've written about these cookies in a previous post, but have never shown you how to make them or what they look like.  I know it's summer and baking should be the furthest from my mind. Thinking about how light and refreshing these cookies are and knowing I had all the ingredients, motivated me to turn on the oven and whip up a batch.   I had thawed out a container of ricotta the other day to make grilled pizza and had some leftover, so this was meant to be!

I don't know if I should thank her or curse her, my cousin Joyce gave me this recipe a few years ago. I think I'll thank her. Thank you Joyce!

Recipe: Makes 29 medium cookies.


Crave-able Ricotta Cookies 
They are so delicious!  They are soft & light, like little clouds. 

2 1/4 c flour
1 tsp baking powder
1/2 tsp baking soda
1/8 tsp salt
1/2 c (1 stick) unsalted butter - softened
1 cup granulated sugar
1 egg
1 cup ricotta
2 tsp lemon extract (options: vanilla, or anise)
Optional: grate a little fresh lemon zest into the batter.

Glaze 

2 cups confectioners sugar
3 TBSP milk
a drop or two of lemon extract

Heat oven to 350. Coat 2 baking sheets with nonstick cooking spray or line with silpat type mats.  Whisk flour baking powder, baking soda and salt together. Set aside.
Beat with a mixer butter & sugar until blended.
Add egg, ricotta and vanilla, beat with a wooden spook just until combined.
If using mixer; On low speed add flour mix and beat until blended. Drop by tablespoonfuls or medium batter scoop onto prepared cookie sheets.
Bake at 350 degrees for 14 - 17 min or until lightly browned around edges.
Let cool on sheets.
Top with optional glaze.  

I seldom glaze these, they are so good just as they are.  If you don't glaze, no need to cool, just eat!   These cookies freeze well so you can portion control your sweet tooth.


Ingredients, missing from photo: salt

Some of the gadgets used in preparing this recipe.
 Missing from the photo: hand mixer, whisk, bowl for
wet ingredients & a wooden spoon.

Be sure your baking powder isn't expired. Looks like I need a new can.

Dry ingredients, Wet ingredients

After gradually adding dry to wet, mix with wooden spoon.

Twenty nine scoops of ricotta cookie batter ready to go!

Very light color on top, lightly browned on the bottom, very soft texture.

Light, airy, cookies with a refreshing hint of  lemon.